#python github
Explore tagged Tumblr posts
Visit Tumblr Blog
Explore Tumblr blogs with no restrictions, modern design and the best experience.
Last Seen Tumblr Blogs


Fun Fact
Hackers stole 65M passwords from Tumblr in 2013.
Text
Let's discover Python and simplicity in programming. In this blog, explore the top 5 Python libraries for data science and get a brief overview of each.
#python github#python idle#python tools#python#data scientist#aws services#crmsoftware#ethics first#habilelabs
0 notes
Text

Welcome back, coding enthusiasts! Today we'll talk about Git & Github , the must-know duo for any modern developer. Whether you're just starting out or need a refresher, this guide will walk you through everything from setup to intermediate-level use. Let’s jump in!
What is Git?
Git is a version control system. It helps you as a developer:
Track changes in your codebase, so if anything breaks, you can go back to a previous version. (Trust me, this happens more often than you’d think!)
Collaborate with others : whether you're working on a team project or contributing to an open-source repo, Git helps manage multiple versions of a project.
In short, Git allows you to work smarter, not harder. Developers who aren't familiar with the basics of Git? Let’s just say they’re missing a key tool in their toolkit.
What is Github ?
GitHub is a web-based platform that uses Git for version control and collaboration. It provides an interface to manage your repositories, track bugs, request new features, and much more. Think of it as a place where your Git repositories live, and where real teamwork happens. You can collaborate, share your code, and contribute to other projects, all while keeping everything well-organized.
Git & Github : not the same thing !
Git is the tool you use to create repositories and manage code on your local machine while GitHub is the platform where you host those repositories and collaborate with others. You can also host Git repositories on other platforms like GitLab and BitBucket, but GitHub is the most popular.
Installing Git (Windows, Linux, and macOS Users)
You can go ahead and download Git for your platform from (git-scm.com)
Using Git
You can use Git either through the command line (Terminal) or through a GUI. However, as a developer, it’s highly recommended to learn the terminal approach. Why? Because it’s more efficient, and understanding the commands will give you a better grasp of how Git works under the hood.
GitWorkflow
Git operates in several key areas:
Working directory (on your local machine)
Staging area (where changes are prepared to be committed)
Local repository (stored in the hidden .git directory in your project)
Remote repository (the version of the project stored on GitHub or other hosting platforms)
Let’s look at the basic commands that move code between these areas:
git init: Initializes a Git repository in your project directory, creating the .git folder.
git add: Adds your files to the staging area, where they’re prepared for committing.
git commit: Commits your staged files to your local repository.
git log: Shows the history of commits.
git push: Pushes your changes to the remote repository (like GitHub).
git pull: Pulls changes from the remote repository into your working directory.
git clone: Clones a remote repository to your local machine, maintaining the connection to the remote repo.
Branching and merging
When working in a team, it’s important to never mess up the main branch (often called master or main). This is the core of your project, and it's essential to keep it stable.
To do this, we branch out for new features or bug fixes. This way, you can make changes without affecting the main project until you’re ready to merge. Only merge your work back into the main branch once you're confident that it’s ready to go.
Getting Started: From Installation to Intermediate
Now, let’s go step-by-step through the process of using Git and GitHub from installation to pushing your first project.
Configuring Git
After installing Git, you’ll need to tell Git your name and email. This helps Git keep track of who made each change. To do this, run:

Master vs. Main Branch
By default, Git used to name the default branch master, but GitHub switched it to main for inclusivity reasons. To avoid confusion, check your default branch:

Pushing Changes to GitHub
Let’s go through an example of pushing your changes to GitHub.
First, initialize Git in your project directory:

Then to get the ‘untracked files’ , the files that we haven’t added yet to our staging area , we run the command

Now that you’ve guessed it we’re gonna run the git add command , you can add your files individually by running git add name or all at once like I did here

And finally it's time to commit our file to the local repository

Now, create a new repository on GitHub (it’s easy , just follow these instructions along with me)
Assuming you already created your github account you’ll go to this link and change username by your actual username : https://github.com/username?tab=repositories , then follow these instructions :


You can add a name and choose wether you repo can be public or private for now and forget about everything else for now.

Once your repository created on github , you’ll get this :

As you might’ve noticed, we’ve already run all these commands , all what’s left for us to do is to push our files from our local repository to our remote repository , so let’s go ahead and do that

And just like this we have successfully pushed our files to the remote repository
Here, you can see the default branch main, the total number of branches, your latest commit message along with how long ago it was made, and the number of commits you've made on that branch.

Now what is a Readme file ?
A README file is a markdown file where you can add any relevant information about your code or the specific functionality in a particular branch—since each branch can have its own README.
It also serves as a guide for anyone who clones your repository, showing them exactly how to use it.
You can add a README from this button:

Or, you can create it using a command and push it manually:

But for the sake of demonstrating how to pull content from a remote repository, we’re going with the first option:

Once that’s done, it gets added to the repository just like any other file—with a commit message and timestamp.
However, the README file isn’t on my local machine yet, so I’ll run the git pull command:

Now everything is up to date. And this is just the tiniest example of how you can pull content from your remote repository.
What is .gitignore file ?
Sometimes, you don’t want to push everything to GitHub—especially sensitive files like environment variables or API keys. These shouldn’t be shared publicly. In fact, GitHub might even send you a warning email if you do:

To avoid this, you should create a .gitignore file, like this:

Any file listed in .gitignore will not be pushed to GitHub. So you’re all set!
Cloning
When you want to copy a GitHub repository to your local machine (aka "clone" it), you have two main options:
Clone using HTTPS: This is the most straightforward method. You just copy the HTTPS link from GitHub and run:

It's simple, doesn’t require extra setup, and works well for most users. But each time you push or pull, GitHub may ask for your username and password (or personal access token if you've enabled 2FA).
But if you wanna clone using ssh , you’ll need to know a bit more about ssh keys , so let’s talk about that.
Clone using SSH (Secure Shell): This method uses SSH keys for authentication. Once set up, it’s more secure and doesn't prompt you for credentials every time. Here's how it works:
So what is an SSH key, actually?
Think of SSH keys as a digital handshake between your computer and GitHub.
Your computer generates a key pair:
A private key (stored safely on your machine)
A public key (shared with GitHub)
When you try to access GitHub via SSH, GitHub checks if the public key you've registered matches the private key on your machine.
If they match, you're in — no password prompts needed.
Steps to set up SSH with GitHub:
Generate your SSH key:

2. Start the SSH agent and add your key:

3. Copy your public key:

Then copy the output to your clipboard.
Add it to your GitHub account:
Go to GitHub → Settings → SSH and GPG keys
Click New SSH key
Paste your public key and save.
5. Now you'll be able to clone using SSH like this:

From now on, any interaction with GitHub over SSH will just work — no password typing, just smooth encrypted magic.
And there you have it ! Until next time — happy coding, and may your merges always be conflict-free! ✨👩💻👨💻
#code#codeblr#css#html#javascript#java development company#python#studyblr#progblr#programming#comp sci#web design#web developers#web development#website design#webdev#website#tech#html css#learn to code#github
93 notes
·
View notes
Text


deskpet mikey :)
#if anyone wants him i can put him on a github repo with instructions on how to configure him to ur screensize / the right file path#also u need to have python and pyautogui installed and also he only works properly on windows. i need to fix the little white dots#i love my barely functional son 🫶#my art :D#woe.begone
60 notes
·
View notes
Text

Plus it's a reptile
#reptile#zoology#animals#science#programming#coding#python#codeblr#github#memes#meme#insidesjoke#comedy#humour#biology
170 notes
·
View notes
Text
I finally decided to download my Spotify music so that I could stop using it, and after a day wasted in trying all the online downloader and a couple of programs, I forced myself to be smart and use python.
It took one (1) line of code in python and copy pasting two things from the website. It was literally easier than any other method and it worked so much better. I downloaded over 2000 songs. It recognises the ones that are double so you only have one. It did 2000 all by itself, not 1 at a time or 100 at a time. It's completely free.
The existence of Github prove by itself that humans are not inherently selfish.
#Spotify#deezer#github#Music#music download#Python#I was so stupid#I keep being afraid of using programming#When it is actually the easier and fastest way in certain situations#Trying to get free of Spotify#You should all download your music is so easy
7 notes
·
View notes
Text
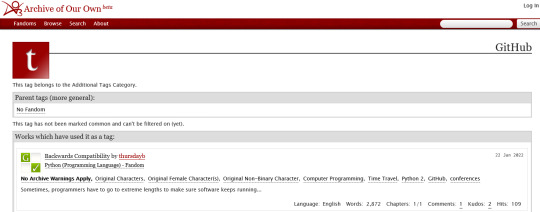
I was looking for what I eventually found here: https://github.com/otwcode/otwarchive
But in the meantime searching "archive of our own github" turned up a number of things including this: https://archiveofourown.org/tags/github/
3 notes
·
View notes
Text
WOOOO, GOT THE TUMBLR BACKUP PYTHON SCRIPT WORKING (ノ◕ヮ◕)ノ*.✧
#it's funny bc at least on mint cinnamon there's uh. some extra steps needed to get the thing off the ground#that are... not explained in the big instructional gdoc (or in the github documentation for that matter)#perhaps because they're like... standard features of How To Python Linux that someone Doing That is assumed to already know? idk#and well. I cannot express how much I am not that user#BUT WE LEARN AS WE GO VIA PROFUSE GOOGLING AND TRIAL & ERROR!#.....this script's probably going to be running all night isn't it >_>#content is for other people
6 notes
·
View notes
Text
Any MCR fans in software engineering/web dev?
I'm looking for mutuals who love to code and also love MCR. I wanna do a little project >:D also just want some buds to relate to.

#my chemical romance#mcr#software engineering#web development#web developers#python#c++ programming#programming#programmer#github#coding#baby coder#codeblr#react#java#javascript#reactjs#frontenddevelopment#learntocode#webdev#nodejs#full stack developer#gerard way#frank iero#my chem gerard#mikey way#ray toro
2 notes
·
View notes
Text
Six New Named Titan Lakes!
Hot off the presses from the Gazetteer of Planetary Nomenclature (5/23/2024)
The IAU Working Group for Planetary System Nomenclature has approved the names Chapala Lacus , Robino Lacus, Fena Lacus, Dem Lacus, Tibi Lacus, and Vaca Lacus for six features on Titan. For more information, please see the Titan North Pole nomenclature map in the Gazetteer of Planetary Nomenclature
All six new named features are lakes (lacus) and are all named after lakes on Earth
Chapala Lacus: Named after a lake in Mexico
Dem Lacus: Named after a Lake in Burkina Faso
Fena Lacus: Named after a lake in Guam
Robino Lacus: Named after a lake in Haiti
Tibi Lacus: Named after a lake in the Sierra Leone
Vaca Lacus: Named after a Lake in Belize
All six lakes are visible from Cassini between 72-78 degrees latitude and 129-144 degrees longitude on Titan. The lakes are the small dark smudges:

The images above were recovered from the Cassini RADAR images taken of the spot on September 30, 2005 (T18-S01). This was done via pydar—a Python tool I help develop
Side note: it took longer than expected to get these changes up in Pydar because the web scrapper in place kept failing mysteriously. I think the folks that run the planetary data service for Cassini should sent me—me specifically—an email to tell me they were updating the website URL from “pds-imaging.jpl.nasa.gov” to “planetarydata.jpl.nasa.gov” since it broke the backend for Pydar in a very strange way and I couldn’t find any reference to the change. All fixed now but it was confusing to debug
#titan#astronomy#Pydar#Saturn#Saturn moon#research highlight#python project#python#nasa#GitHub#jpl#jet propulsion laboratory#cassini huygens#cassini
9 notes
·
View notes
Text
.
#thought i'd do some python coding tonight#spent a solid hour trying to install an old version of a certain package in a virtual environment#reading long complex bug-report threads on github#and innumerable stackoverflow pages about it#and trying workaround after workaround#and nothing worked. so never mind i guess. i'm too sleeby for this
2 notes
·
View notes
Text
Have you worked on Python and Django in the project? Let's discuss few points which will make you a better Python developer and help you to get a better opportunity.
#python#python developer#python Skills#backend python developer#python tools#python github#habilelabs#ethics first
0 notes
Text
Today was a good day. I wrote my first Python script to automate a task that would have taken hours to do manually.
Let's just ignore the fact that it was ~10 lines to download pdfs and firmware blobs that the manufacturer decided to upload publicly on github without any revisions or even making them easily available when you contact support.
Also, ignore the wasted time and avoidable emails if I'd known about this earlier.
And forget the insanity that is hosting all these large binary files in >200 git repositories because damn it, my code did useful work today, and my boss did tell me to download it all.
I shouldn't neglect to include that getting the environment set up and actually running the script took longer than writing it, which is a win on its own in my book. I can't even imagine how long it would have taken to do so manually.
3 notes
·
View notes
Text
Load Balancing Web Sockets with K8s/Istio
When load balancing WebSockets in a Kubernetes (K8s) environment with Istio, there are several considerations to ensure persistent, low-latency connections. WebSockets require special handling because they are long-lived, bidirectional connections, which are different from standard HTTP request-response communication. Here’s a guide to implementing load balancing for WebSockets using Istio.
1. Enable WebSocket Support in Istio
By default, Istio supports WebSocket connections, but certain configurations may need tweaking. You should ensure that:
Destination rules and VirtualServices are configured appropriately to allow WebSocket traffic.
Example VirtualService Configuration.
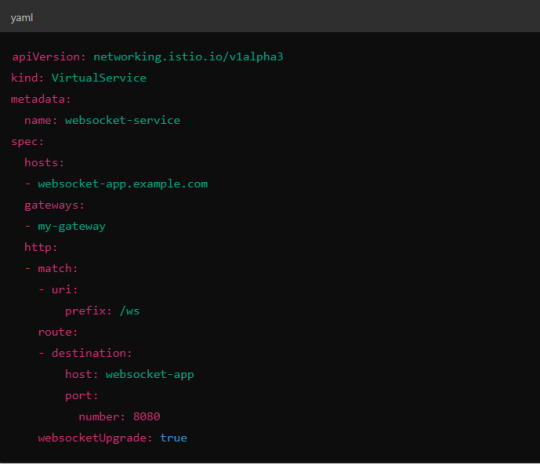
Here, websocketUpgrade: true explicitly allows WebSocket traffic and ensures that Istio won’t downgrade the WebSocket connection to HTTP.
2. Session Affinity (Sticky Sessions)
In WebSocket applications, sticky sessions or session affinity is often necessary to keep long-running WebSocket connections tied to the same backend pod. Without session affinity, WebSocket connections can be terminated if the load balancer routes the traffic to a different pod.
Implementing Session Affinity in Istio.
Session affinity is typically achieved by setting the sessionAffinity field to ClientIP at the Kubernetes service level.

In Istio, you might also control affinity using headers. For example, Istio can route traffic based on headers by configuring a VirtualService to ensure connections stay on the same backend.
3. Load Balancing Strategy
Since WebSocket connections are long-lived, round-robin or random load balancing strategies can lead to unbalanced workloads across pods. To address this, you may consider using least connection or consistent hashing algorithms to ensure that existing connections are efficiently distributed.
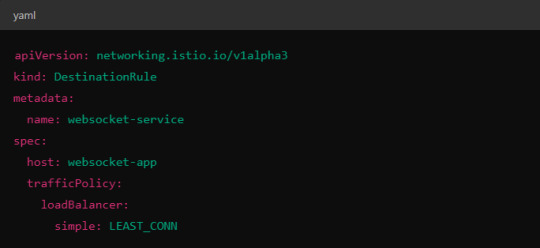
Load Balancer Configuration in Istio.
Istio allows you to specify different load balancing strategies in the DestinationRule for your services. For WebSockets, the LEAST_CONN strategy may be more appropriate.
Alternatively, you could use consistent hashing for a more sticky routing based on connection properties like the user session ID.
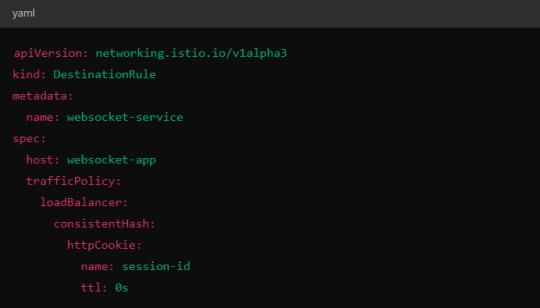
This configuration ensures that connections with the same session ID go to the same pod.
4. Scaling Considerations
WebSocket applications can handle a large number of concurrent connections, so you’ll need to ensure that your Kubernetes cluster can scale appropriately.
Horizontal Pod Autoscaler (HPA): Use an HPA to automatically scale your pods based on metrics like CPU, memory, or custom metrics such as open WebSocket connections.
Istio Autoscaler: You may also scale Istio itself to handle the increased load on the control plane as WebSocket connections increase.
5. Connection Timeouts and Keep-Alive
Ensure that both your WebSocket clients and the Istio proxy (Envoy) are configured for long-lived connections. Some settings that need attention:
Timeouts: In VirtualService, make sure there are no aggressive timeout settings that would prematurely close WebSocket connections.

Keep-Alive Settings: You can also adjust the keep-alive settings at the Envoy level if necessary. Envoy, the proxy used by Istio, supports long-lived WebSocket connections out-of-the-box, but custom keep-alive policies can be configured.
6. Ingress Gateway Configuration
If you're using an Istio Ingress Gateway, ensure that it is configured to handle WebSocket traffic. The gateway should allow for WebSocket connections on the relevant port.

This configuration ensures that the Ingress Gateway can handle WebSocket upgrades and correctly route them to the backend service.
Summary of Key Steps
Enable WebSocket support in Istio’s VirtualService.
Use session affinity to tie WebSocket connections to the same backend pod.
Choose an appropriate load balancing strategy, such as least connection or consistent hashing.
Set timeouts and keep-alive policies to ensure long-lived WebSocket connections.
Configure the Ingress Gateway to handle WebSocket traffic.
By properly configuring Istio, Kubernetes, and your WebSocket service, you can efficiently load balance WebSocket connections in a microservices architecture.
#kubernetes#websockets#Load Balancing#devops#linux#coding#programming#Istio#virtualservices#Load Balancer#Kubernetes cluster#gateway#python#devlog#github#ansible
5 notes
·
View notes
Text


CircuitPython reaches 4,000 Stars on GitHub - Thank you to all in our fabulous CircuitPython community, developing projects with CircuitPython! https://blog.adafruit.com/2024/09/04/circuitpython-reaches-4000-stars-on-github-circuitpython-github-adafruit/
CircuitPython is an education friendly open source derivative of MicroPython. CircuitPython supports use on educational development boards designed and sold by Adafruit and a number of other vendors in addition to single board computers (SBC) running the Blinka compatibility layer software. Adafruit CircuitPython features unified Python core APIs and nearly 500 Adafruit libraries and drivers of that work with it. Adafruit supports MicroPython with code contributions and financially via Github sponsorship AND directly to MicroPython https://github.com/sponsors/micropython
3,000 Stars – MAY 22, 2022 2,500 Stars – JULY 16, 2021 2,000 Stars – JANUARY 27, 2021 1,700 Stars – MAY19, 2020 1,000 Stars – FEBRUARY 10, 2019 800 Stars – JANUARY 21, 2019
It took 2,935 days (about 8 years) for the “adafruit/circuitpython” repository to reach 4,000 stars on GitHub. After doing some analysis with ChatGPT on the CSV file of the data, a few interesting things!
After reaching around 1,000 stars, the growth rate appears to accelerate, indicating increased visibility and popularity within the developer community.
The project shows a trend of consistent engagement and steady growth without significant drops, which is a positive indicator of sustained community interest.
Based on the overall growth trend of the repository, it is estimated to take approximately 725 days (around 2 years) for the repository to reach 5,000 stars on GitHub. The projected date for reaching this milestone would be around August 30, 2026.
4 notes
·
View notes
Text

the things I do for you people and your pronouns smh
make the text strings in my CLI game code absolutely fucking unreadable apparently
#this is why I opposed singular they/them from day 1 that shit changes verbs and it is my grammatical enemy for that reason#coding#game development#command line game#mild spoilers for fun lil python project coming to the public bit of my github soon#as in idk how to make this be a application someone who can't run a python file itself on their computer could play but uhh#if you do have python on ur computer you'll be able to download and play this (I think.. I'm still pretty confused abt how github works)
3 notes
·
View notes
Text
i'm working on a new security tool called dbe.
dbe is designed to simulate a cybersecurity scenario in which an agent learns to perform various actions in order to infect machines, perform self-healing, and propagate to other machines. The agent uses a Q-learning algorithm to learn which actions to take based on the current state of the environment.
The script takes a list of IP addresses as input and scans them to see if they are vulnerable to a specific exploit. If a vulnerable machine is found, the agent tries to infect it by connecting to a remote server and executing a payload. The agent also performs periodic self-healing actions to ensure that it is running smoothly, and propagates to other machines in order to spread the infection.
The script uses a Q-table to keep track of the expected rewards for each action in each state, and updates the Q-table based on the rewards received for each action taken. The agent also uses a decaying exploration probability to balance exploration and exploitation of the environment.
The script is written in Python and uses various libraries such as subprocess, threading, and numpy to perform its functions. It can be run from the command line with various options to customize its behavior.
In simpler terms, the script is like a game where the agent learns to take actions in order to achieve a goal (in this case, infecting machines and spreading the infection). The agent uses a special kind of learning algorithm called Q-learning to figure out which actions are the best to take in each situation. The script also includes some safety measures to make sure the agent doesn't cause any harm to itself or others.
https://github.com/geeknik/dbe
#open source#python#github#geeknik#writing#blog#tumblr#twitter#foss#machine learning#cybersecurity#infosec#malware
2 notes
·
View notes